Mango sago, a stunning tropical dessert from Southeast Asia, is equally popular here in India! That’s simply because mango is the most loved summer fruit here and sago is part of our staples for ages!
 If you wanna make just one mango dessert recipe this summer season, then make this vegan mango sago without thinking twice! You will fall in love with yourself once you try this! I bet!
This supremely creamy & velvety mango sago is just like a hug that will fill your heart & soul with warmth that you didn’t even know you have always been craving for!
This gorgeous Pinterest-worthy dessert would be your perfect choice if you are hosting guests at home as this has a win-win combination!
Firstly, this mango sago is made with the most on-demand seasonal fruit i.e. mango which makes any summer dessert special.
Secondly, being completely dairy-free, this mango dessert can be enjoyed by everyone! Vegans and lactose intolerant guests can have this worry-free! Win-win right?
 What is mango sago?
I know it would be embarrassing for me, but let me confess! I was not aware of this dish until recently when I was researching what to make with mango!
Though sago is part of our Indian food culture, in my home it is usually consumed with milk & sugar during fasting.
Apart from that I had no idea such a marvelous dessert can be made with these humble tapioca pearls pairing it with my favorite fruit of all time!
So to describe what mango sago is I would say it is an eye opener making me realize that many hidden treasures are there in my own cuisine that I am yet to discover!
 Okay, if you too are new to this dessert, I guess you would also like to know what mango sago is!
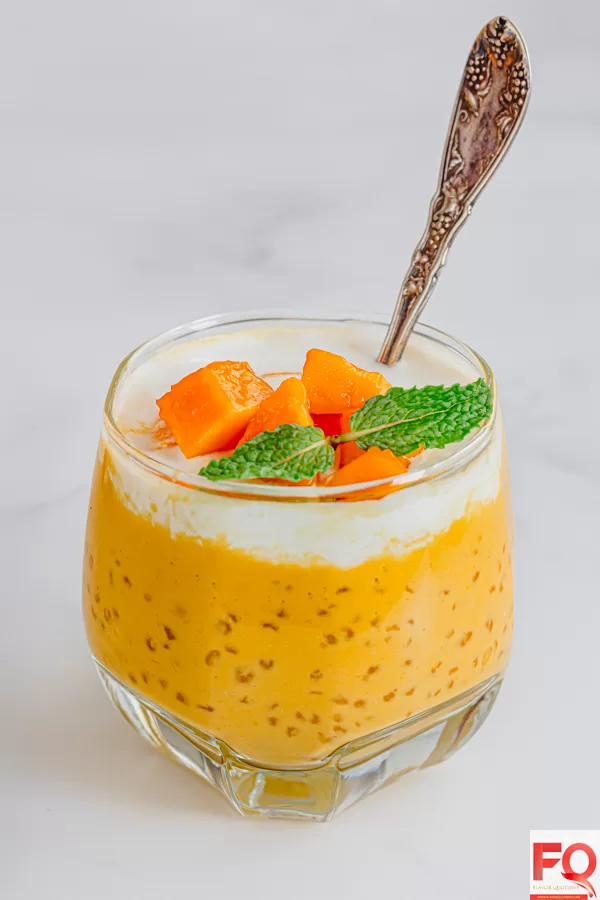
It is a mango dessert made with fresh ripe mangoes and tapioca pearls mixed with any milk of your choice and then chilled before serving!
Since I used coconut milk as I love the flavor combination of mango and coconut, my mango sago was vegan by default.
With summer in its full swing, this chilled creamy mango sago proved to be the best dessert we made for us to enjoy our tropical summer!
 Is Mango sago a healthy dessert?
There is no straight forward answer to this question unfortunately!
I know it is difficult to find a healthy dessert because desserts are supposed to be sweet with loads of sugar, I mean that’s what desserts are for, right!
But in a strange way this vegan mango sago of mine can be labelled as somewhat healthy if you make some intentional choices like I did!
Firstly, my vegan mango sago is completely sugar-free! In fact it is absolutely sweetener-free thanks to the deliciously sweet mangoes I used.
But there is a caveat.
 If you have a very strong sweet tooth, you may find this sugar-free version of mango sago only mildly sweet which may not satisfy your sweet craving soul!
So in that case you may need to add sugar or honey/maple syrup in case of the vegan version.
Some mango sago recipes on the internet use condensed milk as the sweetener. I feel it is too heavy for this fresh summery dessert as it will overshadow the fruitiness of mangoes.
Plus it will become a sugar-bomb which I would definitely request you to avoid!
Secondly, both coconut milk & cream are high in fat and I am aware of that. Since I used a mixture of coconut cream and coconut milk to give it a rich texture, this mango dessert is not low fat.
So you have to be a little cautious about the portion you are having at one go.
I know this dessert is very tempting and it would be very tough to resist its incredibly addictive moussy texture, but you have to be strict with yourself!
 Ingredients for Mango Sago
Mango: After debating for a while on who is the star of this mango sago recipe – mango or sago; I finally zeroed in on mango! Now who can beat this king of summer fruits!
To make this delicious mango dessert, use the sweetest possible mango that you can get your hands on!
I was incredibly lucky to get super-sweet mangos when I planned this recipe which is why my mango sago was completely sugar-free!
You will need about 2 to 3 large mangoes. Actually to be honest, there is no strict rule of how much mango to use here.
Once you make the mango puree, trust your own judgement and adjust the amount of puree as per your preference while mixing it with coconut milk!
To be honest, the more the mango puree, the more sweet & tempting your mango sago would turn out to be!
 Sago/Tapioca: I wasn’t aware that sago is such a popular ingredient in Southeast Asia!
We Indians have been consuming sago for a very long time but honestly I never thought this humble starch can make such a stunning restaurant quality dessert!
My childhood memory of having sago with sweetened milk is still very vivid in my brain! So when I came across this recipe, I instantly knew that I had to make it!
You need to use the sago pearls in this mango sago recipe and there are two steps to prepare it before the final assembling.
First you need to soak them for a few hours – I did soak overnight which was roughly about 8 hours.
Then you need to drop them into boiling water and let them turn completely transparent while stirring continuously to avoid any clumping.
For soaked sago, this second step will take not more than 3 to 4 minutes. Do not overcook them as then they will clump together becoming completely soggy.
 Milk of your choice: My vegan mango sago is made using coconut milk. You may be wondering why I used coconut milk in the first place?
The very simple answer to that is the flavors of mango and coconut are match made in heaven! You gotta trust me on this!
When I made my vegan mango chia seed pudding last season, I realized the same because there too I had used coconut milk.
If you want to go ahead with coconut milk, my only suggestion is to use a combination of coconut milk and coconut cream.
Thanks to the thickness & higher fat content, coconut cream adds an elite richness to the mango sago. I used three parts of coconut milk for one part of coconut cream.
Now just to close the loop on milk, you can use any milk of your choice, dairy or nut-based, in this mango sago recipe and it will turn out fantastic every time!
 Sweetener (optional): I didn’t need to use any sweetener in my mango sago because the mangoes I used were supremely sweet.
Plus coconut cream also adds a hint of natural sweetness.
In case the mangoes you got are not too sweet or if you really want your mango sago to be dessert-like sweet, then you can add a few tablespoons of honey.
Just add a couple tablespoons of honey at a time, taste the sweetness and then only add more if needed.
 How to make summer special mango sago?
Step 1: First wash the tapioca pearls under running water for 3-4 times until water runs clear. Then soak them in drinking water, keeping them immersed under enough water.
Step 2: Leave the bowl of soaked sago covered on the kitchen counter for at least 6 hours. Sago will absorb water and soften as well as increase in size.
Step 3: When the sago is soaked well, drain all the water out.
Step 4: In a large saucepan, boil a large amount of water, enough to hold the soaked sago.
Step 5: Once the water starts to boil, add the soaked sago and keep stirring continuously to avoid clumping.
 Step 6: Cook the tapioca in boiling water just for 3 to 4 minutes or until the tapioca pearls turn completely transparent. Keep stirring while cooking as otherwise they will clump together.
Step 7: Switch off the flame after the tapioca is cooked. Now place a colander inside your kitchen sink.
Step 8: Using a slotted spoon, carefully start transferring the cooked sago pearls into the colander.
Pro tip: I purposefully didn’t ask you to pour all the sago pearls at once into the colander as you need to handle this delicate starch very carefully; else they will just become a clumped up mess!
Step 9: Once all the sago pearls are transferred to the colander, pour cold water over them. This will stop the cooking process and also keep the pearls separated.
Step 10: Leave the sago in the colander to allow all the water to drain out. Meanwhile prepare the milk and mango mixture.
Step 11: Wash and peel the mangoes. Then cut out all the flesh and add to a blender. Blend the mango flesh to make a thick mango puree. Do not add any water.
Step 12: In a large mixing bowl, add coconut milk and coconut cream. Using a wire whisk, mix the milk & cream to make a lump-free mixture.
Step 13: Then add the prepared mango puree to the coconut milk mixture. Using a spatula or whisk stir them together to evenly mix in the mango puree. The mixture will gradually turn pale orange.
Step 14: Now taste the mango-milk mixture for sweetness. Add your choice of sweetener if you wish at this stage.
Step 15: When you are happy with the mango & coconut milk mixture, start adding the cooked sago pearls, half a cup at a time. Mix the pearls with a spatula using a light hand.
Do NOT add all the tapioca pearls at once!
Step 16: Sago pearls should get separated and evenly mix with the mango-milk mixture. Once all the sago pearls are evenly distributed, your mango sago is ready!
But there are three more steps before you can serve them!
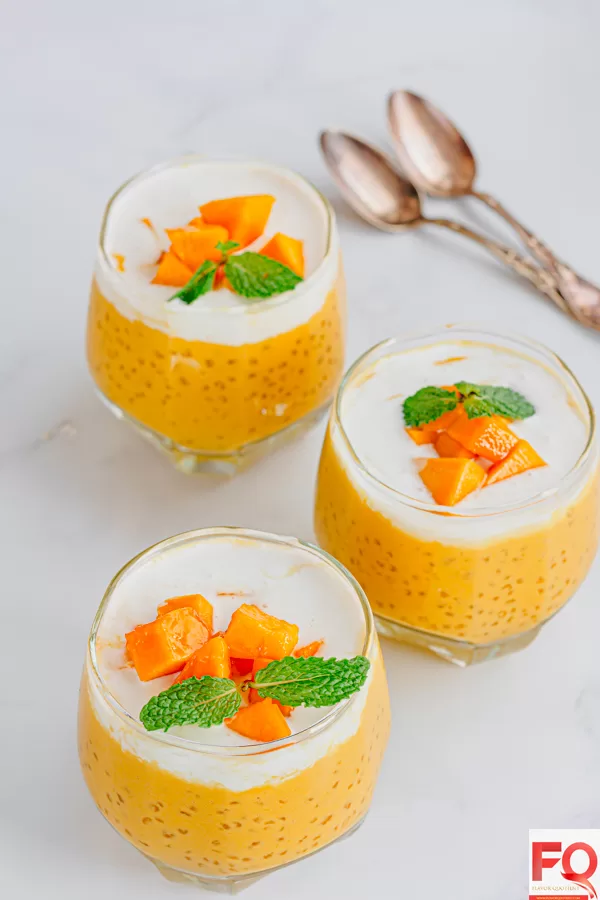
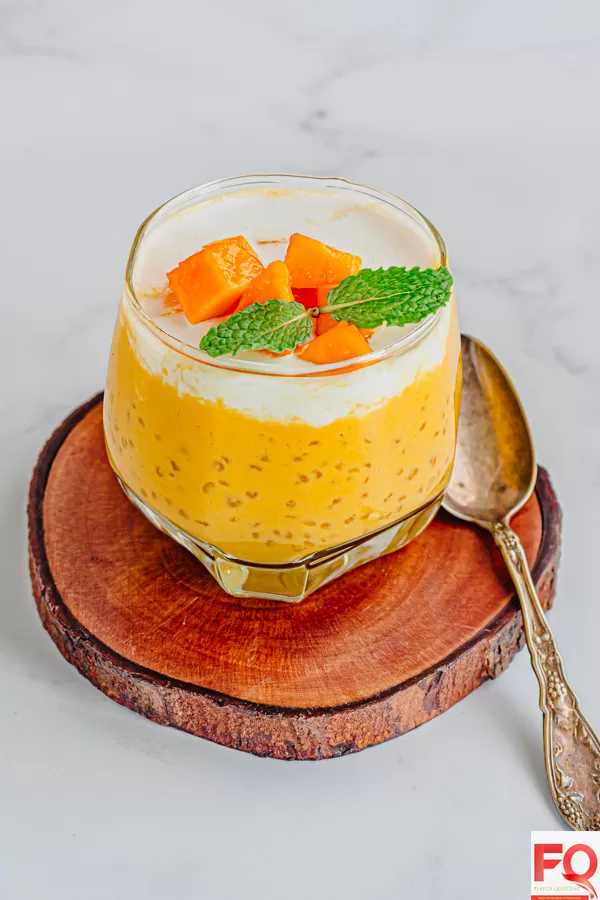
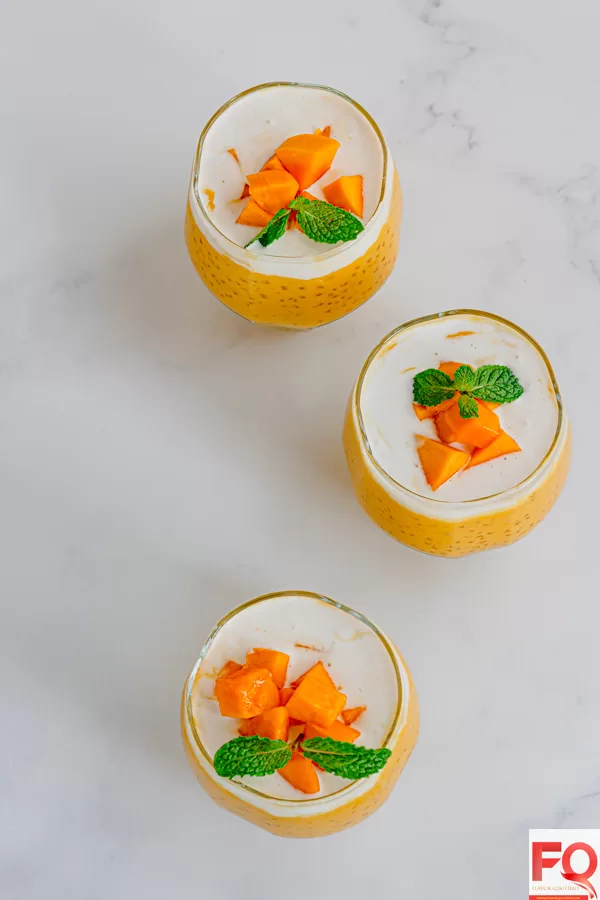
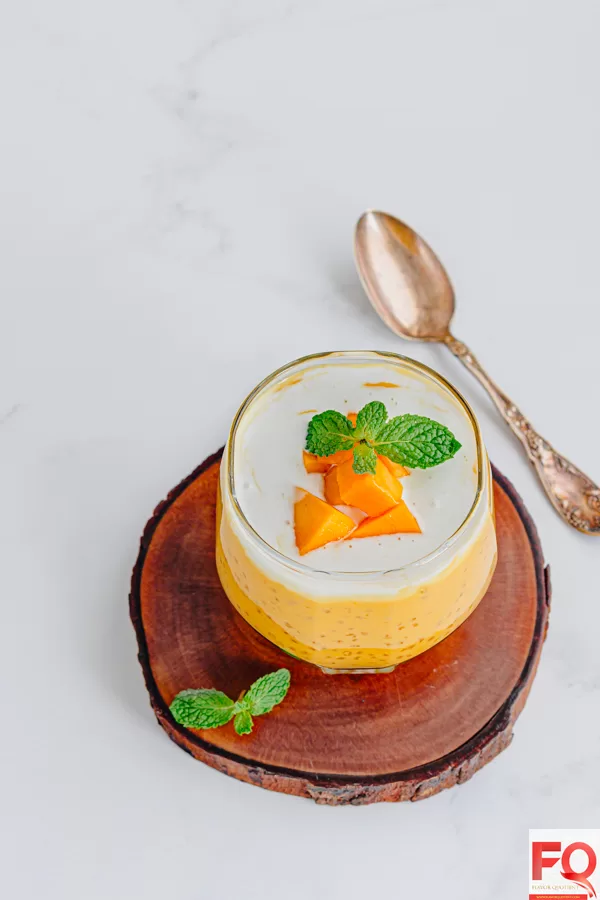
Step 17: Pour the mango sago into individual serving glasses or bowls. Then drizzle a couple tablespoons of coconut cream on top.
Step 18: Transfer the glasses to the refrigerator and let them chill for at least 2 hours before serving.
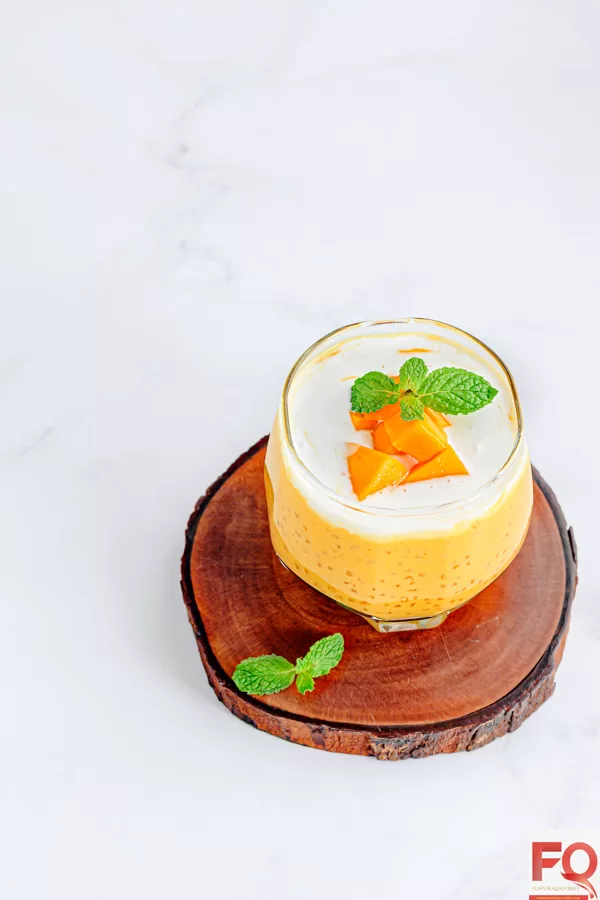
Step 19: When you are ready to serve, garnish each glass by topping it off with freshly cut mango pieces and a mint leaf for vibrant contrast! Serve & enjoy!
 More delicious mango recipes for summers from Flavor Quotient
- Ripe mango - 3 large or 4 medium
- Coconut milk - 600 ml
- Coconut cream - 200 ml
- Sago/Tapioca pearls - 1 & ½ cups
- Freshly cut mangoes to garnish
- Sweetener - optional
- First wash the tapioca pearls under running water for 3-4 times until water runs clear. Then soak them in drinking water, keeping them immersed under enough water.
- Leave the bowl of soaked sago covered on the kitchen counter for at least 6 hours. Sago will absorb water and soften as well as increase in size.
- When the sago is soaked well, drain all the water out.
- In a large saucepan, boil a large amount of water, enough to hold the soaked sago.
- Once the water starts to boil, add the soaked sago and keep stirring continuously to avoid clumping.
- Cook the tapioca in boiling water just for 3 to 4 minutes or until the tapioca pearls turn completely transparent. Keep stirring while cooking as otherwise they will clump together.
- Switch off the flame after the tapioca is cooked. Now place a colander inside your kitchen sink.
- Using a slotted spoon, carefully start transferring the cooked sago pearls into the colander.
- Once all the sago pearls are transferred to the colander, pour cold water over them. This will stop the cooking process and also keep the pearls separated.
- Leave the sago in the colander to allow all the water to drain out. Meanwhile prepare the milk and mango mixture.
- Wash and peel the mangoes. Then cut out all the flesh and add to a blender. Blend the mango flesh to make a thick mango puree. Do not add any water.
- In a large mixing bowl, add coconut milk and coconut cream. Using a wire whisk, mix the milk & cream to make a lump-free mixture.
- Then add the prepared mango puree to the coconut milk mixture. Using a spatula or whisk stir them together to evenly mix in the mango puree. The mixture will gradually turn pale orange.
- Now taste the mango-milk mixture for sweetness. Add your choice of sweetener if you wish at this stage.
- When you are happy with the mango & coconut milk mixture, start adding the cooked sago pearls, half a cup at a time. Mix the pearls with a spatula using a light hand.
- Do NOT add all the tapioca pearls at once!
- Sago pearls should get separated and evenly mix with the mango-milk mixture. Once all the sago pearls are evenly distributed, your mango sago is almost ready!
- Pour the mango sago into individual serving glasses or bowls. Then drizzle a couple tablespoons of coconut cream on top.
- Transfer the glasses to the refrigerator and let them chill for at least 2 hours before serving.
- When you are ready to serve, garnish each glass by topping it off with freshly cut mango pieces and a mint leaf for vibrant contrast! Serve & enjoy!
You may also like:
 Raw Mango Prawn Curry Kerala Style | Mango & Prawn Curry with Coconut Milk
 Mango Lassi Without Sugar | Summer Mango Drink Recipe
 Vegan Mango Chia Seed Pudding | No-Cook Chia Pudding with Mango
 Asian Seafood Curry in Creamy Coconut Milk | Shrimp and Basa Curry in Coconut Milk
 20 Must Try Mango Recipes From Your Favorite Food Blogs for This Summer Season
 Mango Mousse | Best Ever Eggless Mango Mousse Recipe


Liked the recipe? Let us know!