If you enjoy the bread making process as much as I do and can’t get over the awesomeness of the freshly-baked-bread-aroma, then this super easy homemade crusty bread recipe is for you!
 Bread baking has always proved to be therapeutic to me and it could not have been truer in any other situation than this unusual times!
With almost the whole world being under country-wide lockdown and many of us working from home, social media is seeing immense number of videos & photos of bread baking popping up! Yes, bread baking is fun! You can’t deny that! Can you?
I’m sure your home feeds are flooded with photos of freshly baked breads across all the platforms! Same are mine! And I couldn’t have been happier about it!
If people are directing their energy to something so blissful, then who am I to complain or judge! This is not a rat race at all, but just a humble trial to spend our extra time in a more fulfilling way.
I too am no different from all those bread-enthusiasts and hence today I have this super-easy crusty bread recipe for you!
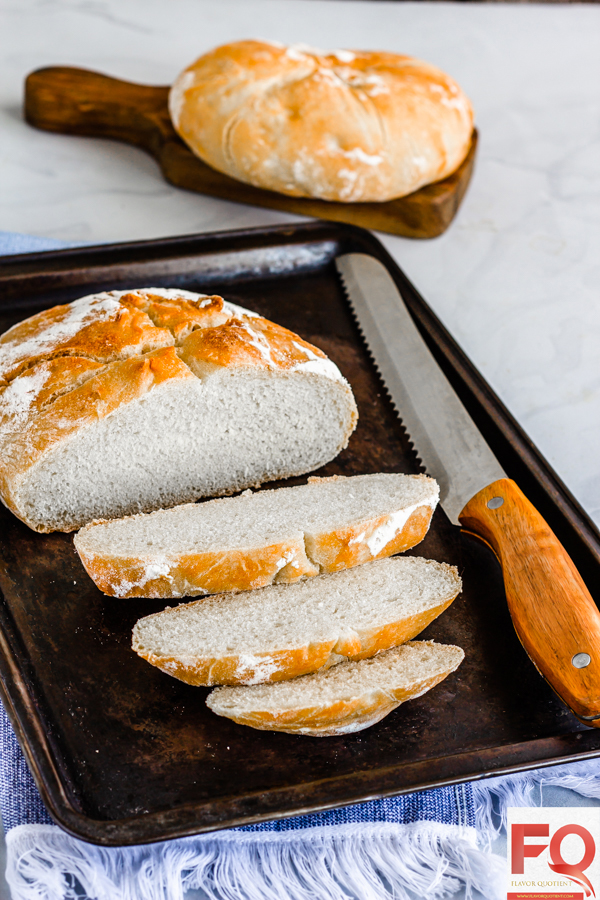 My crusty bread recipe is supremely easy and hence is beginner friendly. This bread has a crispy crust with a tender interior.
But such country-style crusty breads are not as soft as sandwich bread or dinner rolls; so don’t compare it with them. I will highlight the differences between a regular sandwich bread and this country-style crusty bread shortly.
Both are winners with their respective traits and they will bring pure happiness to you once you pull out the freshly baked hot loaf!
This crusty bread is very good for hearty sandwiches and will make for a wonderful weekday lunch stuffed with all your favorite ingredients!
Or if you want to enjoy the simple joys of life in its simplest form, then simply enjoy it toasted with butter which is my favorite way of devouring it!

This homemade crusty bread is a 5 ingredients bread, that too if we consider water as separate ingredient. If not, then you just need 4 things – flour, yeast, salt & sugar!
This is an oil-free or fat-free bread and the tenderness will only be achieved from yeast and your kneading capability.
This one really gives your muscles a workout which according to me feels all worth once you enjoy the outcome! I have a quick pro tip for you to make your kneading process somewhat easier & more manageable.
When you mix all the dry ingredients with water, the dough will feel too sticky initially. Leave it for 15 minutes to rest and then come back to kneading. This short gap will make the kneading process much easier.
 With that pro-tip, I also want to add that make sure not to leave the un-kneaded dough to rest for more than 15 minutes as yeast will start to ferment the dough; but since the gluten has not yet been developed in the flour, yeast will turn the dough gloopy making it impossible to use. 15 minutes gap is the sweet spot which you must hit.
Such country-style breads are quite hearty and somewhat denser in texture; these breads are not yet too popular in India, so we only get them in specialty bakeries of few major cities.
I love to bake all sorts of bread at home; not only because bread-baking gives me immense pleasure, but also these specialty breads are exorbitantly priced in those fancy bakeries and I don’t even know how fresh they are! Hence homemade bread!
 I have adapted this bread recipe from a fabulous YouTube channel called ‘CUKit’ which I have recently discovered! This is a wonderful channel with array of fantastic recipes! This homemade crusty bread recipe, along with many other, has proved to be an undisputed winner!
My only regret with this batch of bread is that I could not make a professional cut on top of the loafs due to lack of razor-sharp knife which is a non-negotiable tool for getting those cuts right!
Other than that special requirement, this bread is really easy to pull off. If you are venturing out into bread baking, this crusty bread could be a nice start.
If you are still not sure whether to take the plunge, then trust me on this – this recipe is the one which will make your bread-baking journey memorable for the rest of your life! Enjoy!
 More delicious bread recipes from Flavor Quotient

- Bread flour – 500 gm (4 cups)
- Active dry yeast – 2 tsp
- Salt – 2 tsp
- Sugar – 1 tsp
- Water – 350 ml (1 & ½ cups)
- Take the water in a glass or bowl and warm it up to 100 F. The water should feel just hot when touched. If it feels too hot, wait till it cools down a bit. Best way to achieve the optimum temperature is to use a thermometer; ensure the temperature is not more than 105 F as that will kill the yeast.
- Add sugar to the warm water. Sprinkle yeast on top of water and give a gentle mix using a fork or spoon. Let the water stand for 5 to 10 minutes or until the top of the water becomes frothy. Your yeast is now activated.
- Take the bread flour in a large bowl and add the salt to it. Make a well at the center and pour the yeast mixture. Using a long, firm wooden spoon, start mixing the water and flour. It will be sticky.
- Once all the water is absorbed, tip in the dough on a lightly floured worktop and keep kneading it until a smooth and elastic dough is formed. It would take about 10 minutes. If the dough feels too sticky while kneading, sprinkle little flour at a time.
- Place the dough in a large bowl and drizzle little olive oil on top of the dough to prevent the formation of a dry layer on top. Tightly cover the top of bowl with plastic wrap to trap the hot air inside.
- Leave the bowl in a warm place e.g. inside a switched-off oven for 90 minutes or until the dough is doubled in size. It may take little less or more time depending on your room temperature.
- After about 90 minutes, gently take the dough out on a floured worktop using a bench-scrapper. Divide the dough into 2 equal-sized portion.
- Take one portion at a time and start shaping the dough. Flatten the dough using your hand, then fold it in itself from all sides. Then shape it into a smooth & round ball keeping the seam side down. Repeat the same for other portion of the dough.
- Now take 2 deep bowls and generously sprinkle flour into each to coat the base as well as sides of the bowl. Carefully lift one shaped dough and drop it into one of the floured bowls keeping the seam side up. Sprinkle the top of dough generously with flour. Repeat the same with other shaped dough.
- Leave the shaped dough in a warm place for 30 minutes or until doubled in size. Also start preheating the oven at 230 C/450 F and place a covered glass (pyrex/borosil) casserole at the center of the oven. If you can bake 2 loafs simultaneously, then keep 2 casseroles together for preheating.
- After about 30 minutes, take the preheated casserole out and remove the lid. Carefully drop in 1 shaped dough into the hot bowl; smooth side should be facing up now as we had kept seam side up while the dough was left to rise.
- Make couple of incision on top of the dough using a very sharp knife. Also spray or sprinkle few drops of water on top.
- Cover the bowl with the lid and bake it at 230 C/450 F for 15 minutes. Then take the bowl out; remove the lid and bake it uncovered for 15 more minutes at reduced temperature of 180 C/350 F. Your bread must be beautifully brown on the top and sides by now.
- Transfer the bread to a cooling rack and bake the other dough similarly to make the second loaf. Let the breads cool down completely before cutting them.
- Cut the breads into slices, toast it with butter and enjoy freshly baked homemade bread!


You may also like:
 Homemade Sandwich Bread | Heavenly Goodness at Home
 Classic Focaccia Bread | Super Easy No-Machine Focaccia Recipe
 Easy Homemade Dinner Rolls Recipe
 Quick Pumpkin Bread with Homemade Pumpkin Puree
 Homemade Buffalo Chicken Pizza | Pizza Dough Recipe
 Best Ever Zucchini Cheddar Bread | Zucchini Cheddar Quick Bread Recipe


Liked the recipe? Let us know!